Learning Objectives
Introduction to Case Automation
Now that you know that a case is a customer question, lets add some magic. Imagine clicking a few buttons so that your case management processes just happen. Instead of hoping that someone forwards an important case to the right person by a specific time, you can set up those actions so that they happen automatically behind the scenes. Life gets easier for your support team, and customer service gets better, when you add a little automation.
Case automation includes a couple of tools. Let’s check out a couple of the main ones, and keep in mind that the key word for these tools is “automatically.”
| Queues | Automatically prioritize your support team’s workload by creating lists from which specific agents can jump in to solve certain types of cases. |
| Assignment Rules | Automatically assign incoming cases to specific agents so that the right people work on the right cases. |
| Auto-Response Rules | Automatically send personalized email responses to customers based on each case’s details. |
| Escalation Rules | Automatically escalate cases to the right people when the cases aren’t solved by a certain time. |
| Macros | Automatically complete repetitive tasks on cases, such as selecting the right email templates, so that agents can spend time doing more important things. |
Since you’ve seen a snapshot of some of the most popular case automation tools, let’s set some of them up. With the Service Cloud, it doesn’t take long to automate common case processes.
Create a Case Queue
Let’s say that you’ve got a team of support agents who need to manage a shared workload of cases for Platinum Support—your company’s premier support level. These cases are from customers who pay big money to get the best service. To help your agents locate and work off this list of important cases from high-priority customers, we’ll create a queue.
- From Setup, enter Queues in the Quick Find box, then select Queues.
- Click New.
- Type a Label and Name for the queue, such as Platinum Support.
- If you want the support agents included in the queue to receive an email when a new case arrives, leave Queue Email blank. Otherwise, type an email address to notify a person or persons with the email address when each new case arrives.
- Add Case to Selected Objects.
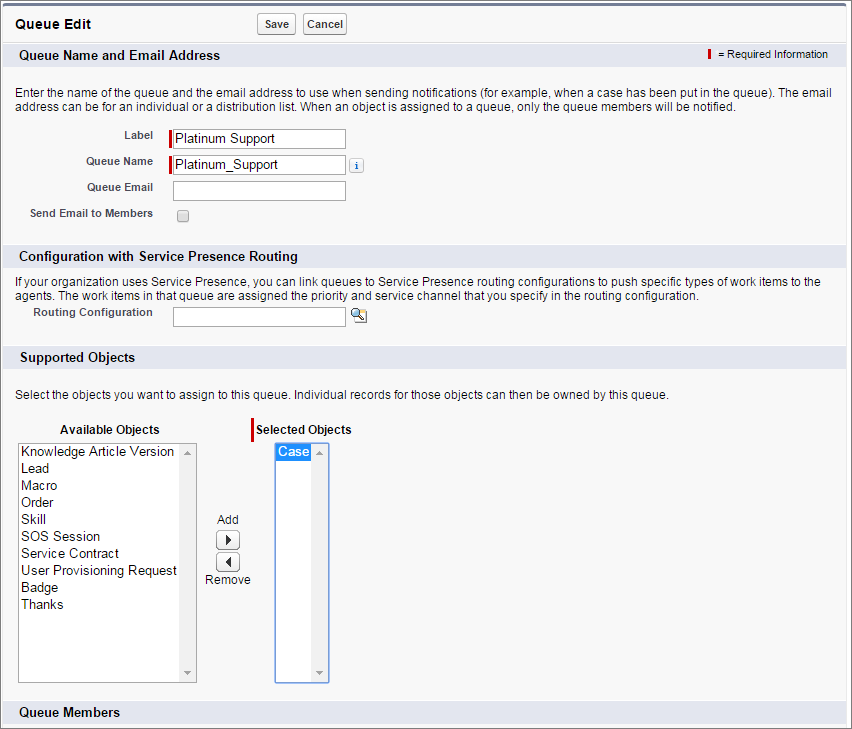
- Add members, including yourself, to the queue and click Save.Now that the queue is created, let’s check it out as if we were support agents. We can get there with a few clicks.
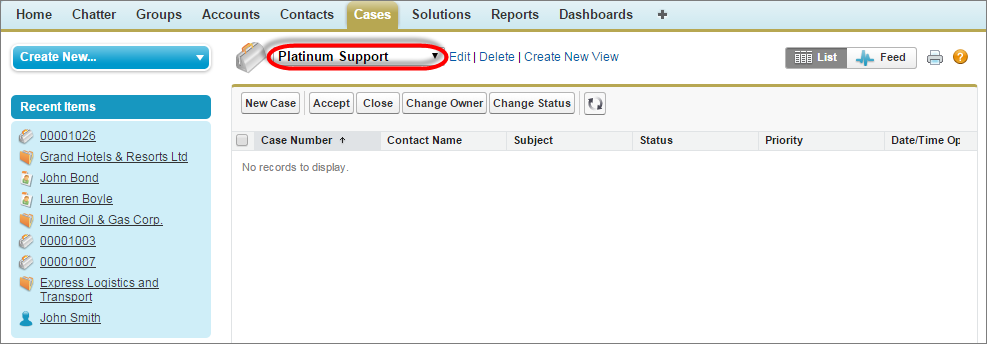
- Click the Cases tab.
- From the list, choose Platinum Support and click Go!Here’s the queue, which is empty at this time.
Add an Assignment Rule
Imagine how much time you could save your customers, and your support team, if cases were magically assigned to the right people with the right answers. With case assignment rules, magic is reality. You can automatically assign incoming cases to one person, groups of people, or even queues. But for now, let’s create an assignment rule so that any case with a contact whose title includes “Awesome Admin” is automatically assigned to you to answer.
- From Setup, enter Case Assignment Rules in the Quick Find box, then select Case Assignment Rules.
- Click New.
- Type, Awesome Admin Assignment, and click Save.
- Select the rule you just created, and next to Rule Entries, click New.Here’s where we add the little details that determine case assignment.
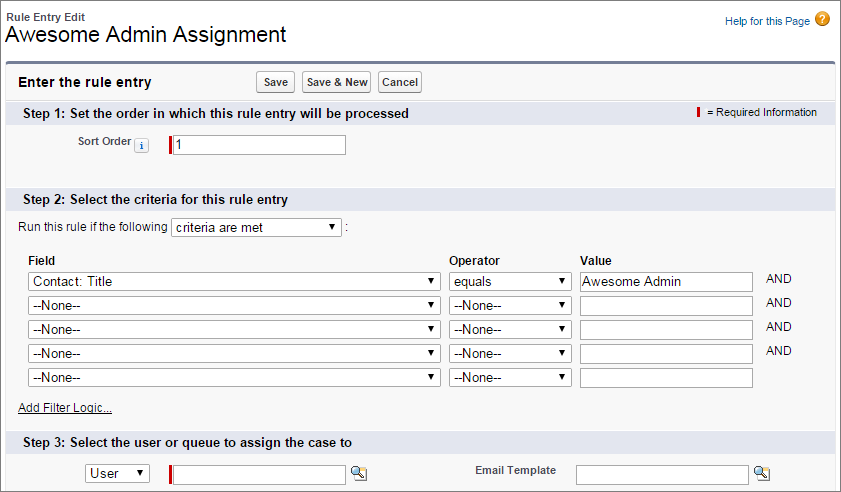
- In Sort Order, type 1 so that the entry we add is processed first. After all, we’re dealing with awesome admins here. In the real world, you’d create one assignment rule with many different entries, which are processed in chronological order. When a case matches an entry, it’s assigned without proceeding to other entries. Won and done!
- For entry criteria, select “Contact: Title equals Awesome Admin.”One of the many useful things about case assignment rules is that you can determine how cases are assigned based on fields from records other than cases. For instance, we’re choosing case assignment based on a contact field, but we could also choose case assignment based on fields from accounts, assets, or users.
- Add yourself as the User assigned to the rule entry.
- In Email Template, click the lookup and choose a template so that you receive an email whenever a case from an awesome admin is assigned to you.
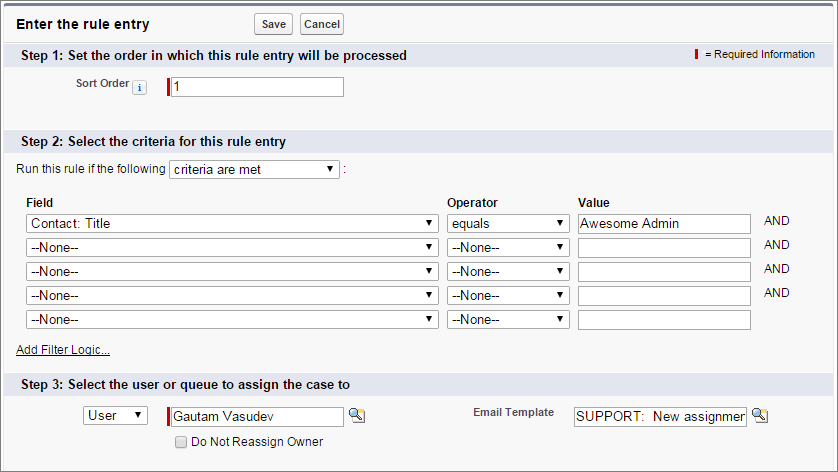
- Click Save.
- Click Edit to mark the rule as Active, then click Save.When you activate an assignment rule, it disables any other assignment rules in your organization, so make sure that your active rule includes all of the assignment entries that your support team needs.
That’s it! Now your support team can ship out superhero capes to all of the awesome admins who contact you.
Add an Auto-Response Rule
Being a customer yourself, you probably like knowing when an email you’ve sent to a company is received. In other words, when you send an email, or post a question on a support website, you probably like receiving an email confirmation that your voice has been heard. With auto-response rules, you can make sure that your customers know that their voices are heard loud and clear. You can set up response rules so that your customers are automatically sent a personalized email when they reach out to your company. What better way to show your customers that your support team values their business?
Before we add an auto-response rule, let’s assume that we’ve already personalized an email template and uploaded it to Salesforce. For our purposes, we’ll use an out-of-the box email template because creating email templates is a lesson beyond the Service Cloud.
- From Setup, enter Case Auto-Response Rules in the Quick Find box, then select Case Auto-Response Rules.
- Click New.
- Type, Welcome to Support, then click Active and Save. Activating a rule deactivates any existing active rules.
- Select the rule you just created, and click New to add a rule entry.Here’s where we add a few details that determine which email template we’ll send to a customer.
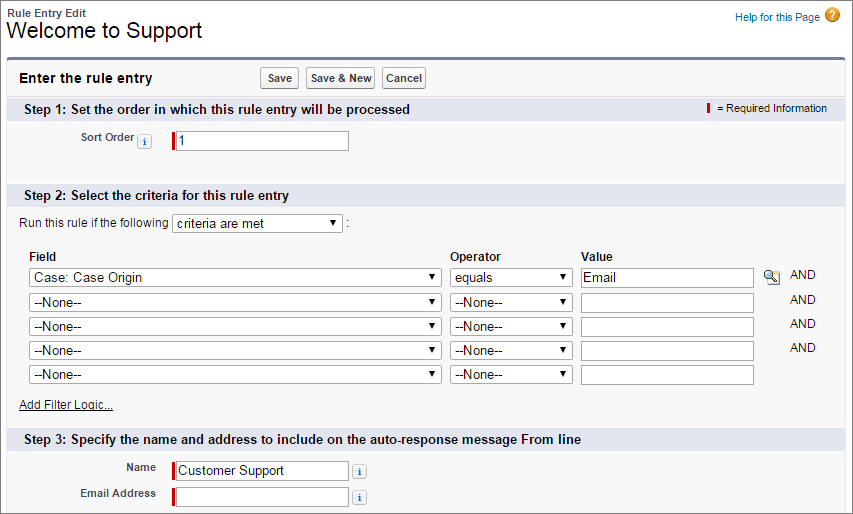
- In Sort Order, type 1 so that the entry we add is processed first. In the real world, you’d create one response rule with many different entries, which are processed in chronological order. When a customer issue comes in and is converted to a case, it’s assigned based on the first entry it matches.
- For entry criteria, select “Case: Case Origin equals email.”Similar to case assignment rules, you can determine the automatic response to send to a customer based on fields from records other than cases.
- Add a name and email address to include in the From line of the email template to send to customers.
- From the lookup field, pick any template to see how this works.

- Click Save and you’re done!
Now any incoming emails from your customers receive an automatic response and confirmation from your support team.
Define When Cases Escalate
There are times when a customer case might jeopardize a big deal or an accidentally overlooked customer might decide to take their business elsewhere. With escalation rules, you can raise the visibility of those cases. Just like assignment rules and auto-response rules, you can determine criteria that automatically triggers an action on a case. The action for escalation rules is to notify or reassign a case to a specific person who can immediately answer the case and restore confidence in your brand.
Let’s define a simple escalation rule. Our rule is to escalate a case to you to answer when it’s been open longer than five hours. For now, let’s use your organization’s default business hours, which simply means that your support team is available 24-hours a day, 7 days a week. But you can change business hours in your Company Profile in Setup.
- From Setup, enter Escalation Rules in the Quick Find box, then select Escalation Rules.
- Click New.
- Type Silver Support, then click Active and Save. Activating a rule deactivates any existing active rules.
- Select the rule you just created, and click New to add a rule entry.Here’s where we add the details that determine when the case gets escalated.
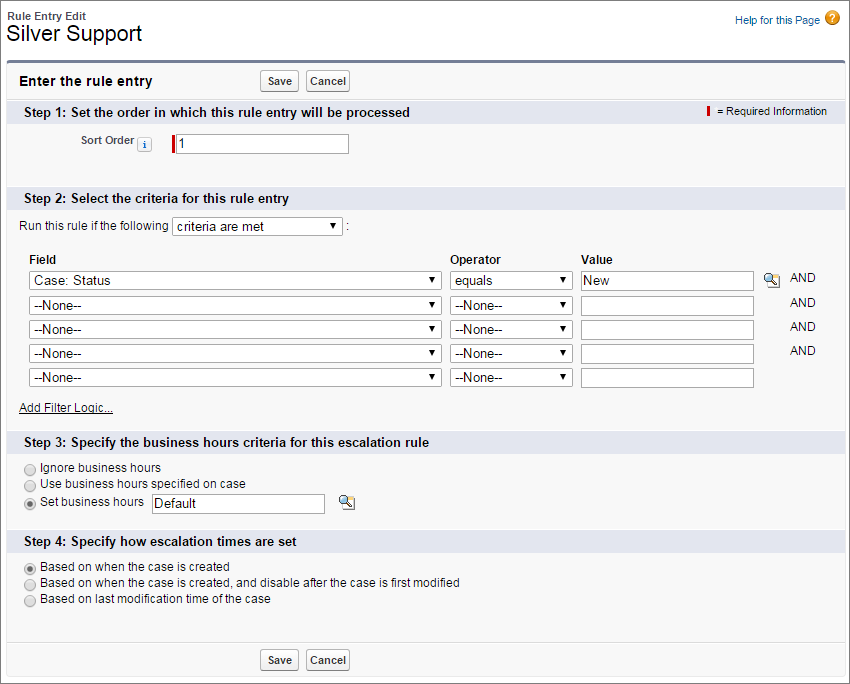
- In Sort Order, type 1 so that the entry we add is processed first. In the real world, you’d create one escalation rule with many different entries, which are processed in chronological order. When a customer issue comes in and is converted to a case, it’s assigned based on the first entry it matches.
- For entry criteria, select “Case: Status equals New.”Similar to other rules, you can determine automatic case escalation based on fields from records other than cases.
- Set business hours to your organization’s default 24/7 support.
- Set that escalation times are based on when cases are created.
- Click Save, then New to add an escalation action.
- In Age Over, enter 5.Here, 5 is the number of hours at which cases escalate when they have a status of New. Remember, we want cases Closed after 5 hours. You can set up escalation actions in 30 minute increments by clicking 0 minutes and selecting 30 minutes.
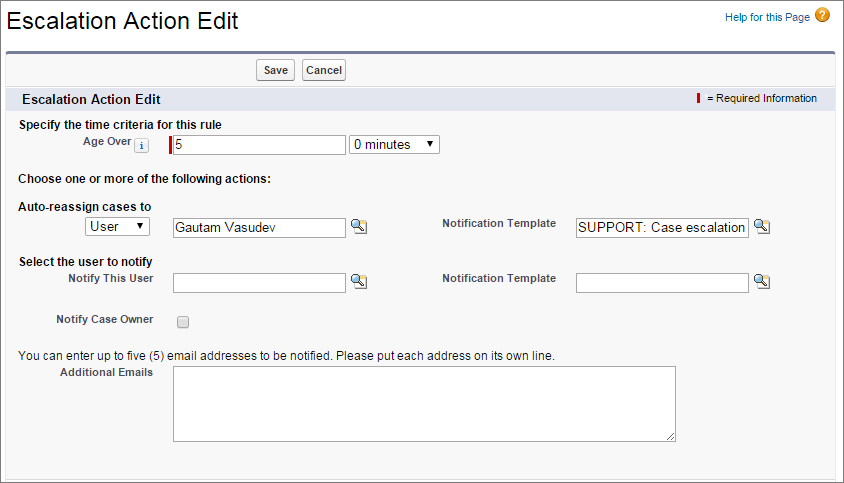
- Auto-assign cases to you, and from Notification Templates, click the lookup icon to pick any template.
- Select yourself as the user to notify, and from Notification Templates, click the lookup icon to add a template to see how this works.
- Click Save.
Now any cases that haven’t been closed in 5 hours are assigned to you.


