CPQ stands for configure, price, and quote. To remember that, think of these questions: What products does the customer want to buy (configure)? How much do those products cost (price)? How can we give the customer details about the sale (quote)?
You ask and answer these questions every day. Salesforce CPQ makes the process much easier for you and your team. And it helps you produce a quality quote that’s complete and accurate and that looks professional.


You ask and answer these questions every day. Salesforce CPQ makes the process much easier for you and your team. And it helps you produce a quality quote that’s complete and accurate and that looks professional.

With Salesforce CPQ, you and your sales team can create quotes quickly, with minimal effort and minimal error. Here’s a little rhyme to introduce you to the wonders of CPQ:
The C is for configure. You pick out what they’ll buy.
The P is for price. We add it up, easy as pie.
The Q is for quote: A nice PDF for you.
And that’s what you get with Salesforce CPQ.
You start by answering a few simple questions about your customer and what they’re looking for. For example, is your customer a commercial, government, or academic institution? Based on your answer to this and other questions specific to your sales process at Infinity Solutions, you see a tailored list of products. Salesforce CPQ uses smart rules to make sure you and your reps sell related products together [1] and to prevent incompatible products from ending up on the same quote.

You have to find the right price for the products you’re selling, and Salesforce CPQ serves as the pricing source of truth. You and your reps can apply discretionary discounts [1] while Salesforce CPQ handles the rest, including the math [2]. Yes, Salesforce CPQ does all the math, automatically. You focus on your customers, not your calculator.

In no time, you’re ready to generate a PDF with all quote details and send it to your customer with just one click. Because you can customize the look of your company’s quotes, they appear professional, and when the whole team uses Salesforce CPQ, every quote looks consistent with the rest. The quote is dynamic too, so if your quote requires special terms, they appear automatically. Add e-signature integration, and you’ll be closing deals faster than ever.

Using Salesforce CPQ, you and your sales team can go from creating a new opportunity to handing the customer a quote in a matter of minutes. A faster, more controlled process means fewer errors, speedier closed deals, more accurate data, and more deals moving through the pipeline.
Salesforce CPQ can help turn your sales team into a lean, mean selling machine.
A Quote is both the document you give the customer and the electronic record of quote data. Your opportunity is where you go to create a new quote. You can create many quotes on that opportunity, but only one can be your primary quote.
However many quotes your opportunity contains, only one can be designated as primary, which means it has a special relationship with the opportunity. For example, the primary quote pushes the total quote amount into the Amount field on your opportunity. The Products related list also updates with the products from your quote. If you later make a different quote primary, your opportunity automatically updates to reflect the new details.
After you create a quote, you add products. Salesforce CPQ makes it easy. You click Add Products to display a list of active products, and you simply check which products you want to include on the quote [1].
This list of products updates whenever new products are created or old products are retired. Customizable filters help you find the products you’re looking for. Your Salesforce admin can group products into categories, such as Product Family, for even easier product selection.
Sometimes your customers don’t know which products they want to buy. They know their business requirements, but not the specific products that meet those needs. Sometimes you don’t know what products are best either. Salesforce CPQ can help by leading you through a guided selling process. When you answer a series of questions [1], you get a list of suggested products that fit the bill.
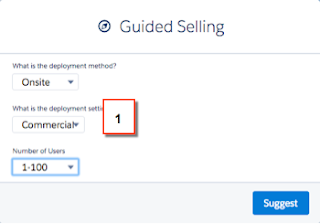
The guided selling process begins when you start adding products to a quote. Your answers to the guide questions determine which products Salesforce CPQ suggests. Sometimes your answers prompt Salesforce CPQ to ask you follow-up questions. You get a dynamic, responsive experience with each quote you create, and you easily find the products that best meet your customers’ needs.
When you add products to a quote, your quote automatically calculates the product prices. After that, any updates to your quote, such as changes in the quantity of the products, are reflected in the quote pricing. Subscription products and prices are automatically calculated as well, based on the subscription term you defined when you created the quote.
A Quote is both the document you give the customer and the electronic record of quote data. Your opportunity is where you go to create a new quote. You can create many quotes on that opportunity, but only one can be your primary quote.
However many quotes your opportunity contains, only one can be designated as primary, which means it has a special relationship with the opportunity. For example, the primary quote pushes the total quote amount into the Amount field on your opportunity. The Products related list also updates with the products from your quote. If you later make a different quote primary, your opportunity automatically updates to reflect the new details.
After you create a quote, you add products. Salesforce CPQ makes it easy. You click Add Products to display a list of active products, and you simply check which products you want to include on the quote [1].
This list of products updates whenever new products are created or old products are retired. Customizable filters help you find the products you’re looking for. Your Salesforce admin can group products into categories, such as Product Family, for even easier product selection.
Sometimes your customers don’t know which products they want to buy. They know their business requirements, but not the specific products that meet those needs. Sometimes you don’t know what products are best either. Salesforce CPQ can help by leading you through a guided selling process. When you answer a series of questions [1], you get a list of suggested products that fit the bill.

The guided selling process begins when you start adding products to a quote. Your answers to the guide questions determine which products Salesforce CPQ suggests. Sometimes your answers prompt Salesforce CPQ to ask you follow-up questions. You get a dynamic, responsive experience with each quote you create, and you easily find the products that best meet your customers’ needs.
Sometimes you have to sell products as a package because the component products depend on each other. With Salesforce CPQ, your Salesforce admin can group products in a set and enforce rules to ensure the set is complete and accurate. These sets are called bundles.

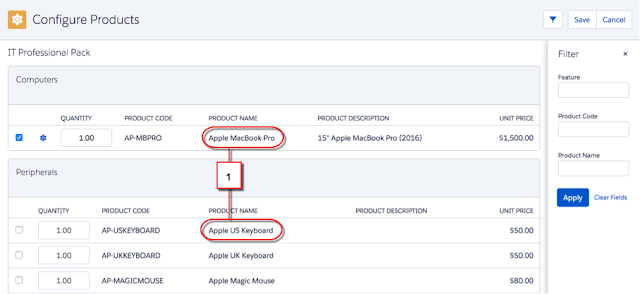
You configure a bundle by choosing a product that’s associated with other products. You see an easy-to-use interface that presents related products that are part of the bundle [1]. Not only does this simplify your product selection, it reminds you and your sales team to discuss potential up-sells or future optional purchases.
You can’t select invalid combinations of products when you configure a bundle. Salesforce CPQ enforces your business logic so that you only present the customer with a technically viable quote. This means fewer errors and less work for you.When you add products to a quote, your quote automatically calculates the product prices. After that, any updates to your quote, such as changes in the quantity of the products, are reflected in the quote pricing. Subscription products and prices are automatically calculated as well, based on the subscription term you defined when you created the quote.
The starting point for most of your products is the standard Salesforce price book. A price book gives you a list price, or standard price, for all Infinity Solutions products. And of course, if you use multiple price books and multi-currency you can expand upon that basic starting point. And if Seamus in Sales Operations wants to define a special product price for one of your accounts, MondoCorp, he can create a Contracted Pricing just for them.
Beyond that starting point, Salesforce CPQ lets you use different pricing methods on a product-by-product basis. This means Infinity Solutions can account for the various ways you need to price your products. For example, Seamus can set a unit cost for a product, and then you and your sales team can apply a markup for a Cost Plus Markup pricing method. If Infinity Solutions has a product that should have a specific price if the quantity falls in a certain range, Seamus chooses the Block Price method. There Seamus defines the various quantity blocks and the price associated with each block.
Salesforce CPQ offers more functionality beyond getting an initial product price. Seamus can apply Discount Schedules to handle tiered discounts for volume-based prices. He can also apply Discount Schedules to subscription products and automatically discount them based on the overall subscription terms you set for a quote.
When you need even more flexibility, you and your sales team can manually enter discounts line by line [1]. And Seamus can handle even more complex pricing scenarios with Salesforce CPQ, like capturing condition-based pricing and calculations with price rules.

 As you can see, there’s a lot of information to display in this PDF document. What information to include, and when or how to present it, can differ from customer to customer. In Salesforce CPQ, the PDF document is dynamic.

A typical PDF quote contains a list of products and services you’re quoting [1] and the prices and discounts on those items [2]. If prices and discounts also have totals and subtotals [3], they display in summary below the list of products and services.
Any important terms and conditions are also in the PDF document [4]. Depending on the products and services being quoted, you sometimes provide additional specification documents for review.
Since this is the final document for your customer to sign, the PDF includes appropriate signature blocks [5].


For example, you can hide specific columns in the line items table under certain conditions. Specific pages, sections, and even individual quote terms can appear dynamically as well. You can add to the output by attaching supplemental materials, such as product specification sheets, to get a single, concatenated PDF.
After you finalize the information to display on the quote, you generate the PDF document itself. The document is stored on both your quote and your opportunity, so others at Infinity Solutions who have internal access can open and view the quote when they need to.
Then you choose one of several ways to share the quote with your customer. Here’s a simple method: With the click of a button, send the quote as an email attachment using a standard Salesforce email template.
Just remember: Salesforce CPQ can dynamically display several different pieces of information about your quote, quickly and easily, in a PDF document. And you can email that PDF to your customer like you would any other email attachment.
For some customers, you choose subscription-based products or services that have a defined start and end date. In those cases, your Closed/Won quote and opportunity result in a contract for the duration of those subscription products. Eventually the contract will end, and you’ll have an opportunity to create a quote for a renewal sale. Salesforce CPQ automates this entire process so creating contracts and quoting renewals is seamless for you and your sales team.
Salesforce CPQ uses the standard Salesforce Contract object, which is associated with your customer’s account. On your opportunity, there is a Salesforce CPQ field, “Contracted” [1], that triggers the contract and renewal cycle.

At the end of a successful sale, you mark the Opportunity as Closed/Won. Your Salesforce admin can create a workflow rule to kick off an automated process that marks the Opportunity as Contracted and creates a Contract on your customer’s Account. The contract includes subscription records for any subscription-based products and keeps track of what products need to be renewed later on.
Once you have a contract with your customer, Salesforce CPQ can easily handle updates to products included on that contract with an amendment. All the business logic you used during the original product selection also applies when you add or remove products from the contract. When you amend your customer’s contract, Salesforce CPQ creates a new quote and opportunity. On your new quote, the subscription products are priced according to how much time is left on the contract.
Salesforce CPQ can automatically create renewal opportunities and quotes for subscription products before your customer’s contract ends. Your renewal opportunity contains all subscription items with quantities from the existing contract, and is automatically updated with additional subscription products if an amendment opportunity is marked as contracted.
When your renewal opportunity is ready for a final quote, Salesforce CPQ can automate that too. The new quote pulls in all added subscription products and any updated pricing. After Salesforce CPQ creates the new quote, you can edit it and add more products or services if you want. Or, you can simply send the renewal quote out for your customer’s signature. Throughout this process, your renewal opportunity and quote populate any pipeline reports or forecasts maintained by Seamus on the sales operations side. He always has the most complete and up-to-date information.
Find the right products, get the right prices, and put together a quote in minutes. Salesforce CPQ makes every step easier, so you and your sales team close deals faster. You can quote us on that.


