Tuesday, July 25, 2017

Salesforce Technology Model

Want to learn more about Salesforce's trusted cloud or just see how it's doing? You can head over to Trust.Salesforce.com at any time to see the real-time and historic status of Salesforce's availability, performance, and vulnerabilities.
If you’re in a highly regulated industry, we know that security is especially important to you. Salesforce commits to the highest security standards, providing you with transparency and real-time availability. And Salesforce scales that same standard to all its customers, no matter their industry.
So how do Salesforce do that? It’s not magic, folks, it’s multitenancy.
With Multitenancy in place, Salesforce handles the maintenance of servers, storage, bandwidth, hardware, and networks. That means that Salesforce' customers don’t have to spend time and money buying hardware and managing data centers. Salesforce shoulders that weight so that its customers can focus on innovation and evolving their business.
That, in a nutshell, is multitenancy: every customer shares the same infrastructure and runs on the same platform. But, like an apartment building, each unit is unique and accessible only to the owner.
Having all their customers under one roof allows them to share Salesforce's investment in trust and innovation with everyone. Hence Salesforce is able to deliver top notch security features wanted by smaller companies, and the flexibility that enterprise companies crave.
But is security in a shared environment really secure? What happens with upgrades? Answer is Salesforce's metadata-driven architecture.
Metadata is widely defined as “data about data”, but what does that really mean? When we talk about metadata at Salesforce, we’re talking about our metadata-driven architecture that allows each customer to customize their own instance of Salesforce.
Edgar's Mission, A customer of Salesforce created their own custom tab called "Animals" to help them track each of their barnyard residents. Using that Animals tab, employees at Edgar's Mission can add information about every sheep, chicken, and goat they work with. This is great for Edgar’s Mission, but it's great for you too! Maybe you don't call it “Accounts” or “Animals.” For you it may be “Stores,” “Patients,” or “Buyers.” It’s all up to you!
The custom tab, the custom fields, the automatic reminders, even any standard reports and Chatter they might wish to use—all of this is metadata. It's the structure of your Salesforce instance, with all of your custom and standard functionality.
Salesforce separates our customers’ customizations into a special metadata layer, so we can update and improve our platform in the background without touching any of their data or customizations. That means that we can give Edgar’s Mission (and all of our other customers) upgrades three times per year with great new features without altering their farm data or breaking their custom “Animals” tab. All of these standard and custom configurations, functionality, and code in your org are metadata. Part of the reason you can move so fast on the platform is that Salesforce knows how to store and serve you that metadata immediately after you create it.
Because their metadata exists in its own layer, Edgar’s mission can customize to their heart’s content. And instead of devoting a resource to developing an infrastructure and keeping things up and running, they can staff up where it counts for their most important customers... in the paddock.
Fueled by the easy accessibility of the metadata layer, the cloud, and Software as a Service (SaaS), this is, ultimately, the power of the platform. It allows you to innovate quickly, and get to market faster with solutions for your customers, partners, and employees—or even your sheep!
Salesforce designs its apps so that customers can do business exactly the way they want. It’s Salesforce' job to equip them with an infrastructure that can be customized and altered at any time to move as fast as they do. Multiple studies show that developing with Salesforce is 5 times faster than traditional application development.
Traditionally, if you wanted to build an app, you’d need hardware and software. You’d have to define access and security, setup reports and analytics, and then actually build the app. If you wanted the app to be mobile and social, you’d have to set that up separately.
Building an app with Salesforce is different. There is no installation of hardware and software, and there are standard options for defining security and user access, creating reports, and making the app social and mobile. Metadata allows us to have all of this pre-built in a separate layer for our customers, so all they have to do is add any customizations they may want as icing on the cake.

Components of Salesforce' Metadata-Driven Architecture

Salesforce' metadata-driven architecture allows it's customers to customize Salesforce in two different ways to fit their unique business needs. In each case, metadata is what carries over each customer’s unique customizations and automatically allows every app to deploy to mobile and account for varying currencies and languages.

Point-and-Click Configuration for all

Configuration allows anyone to quickly and easily configure your applications with a point-and-click interface. This means you don’t have to rely on a developer to create the ideal apps for whatever business goals you’ve set. It could be as simple as renaming accounts to coincide with your industry, just like Edgar’s Mission did with their “Animals” tab. 80% of all our user customizations are made through these basic point-and-click configurations.
IT sees the value in point-and-click too. Opening up simple app development to users gives developers more time to work on custom code for more advanced things like user interfaces and business logic. There’s no need for IT to build services like workflow, collaboration, dashboards, or mobile interfaces, or worry about managing its own infrastructure. Salesforce handles the scaling, performance, database configuration, servers, and storage.

Custom Code for developers

Creating custom code is slightly more complicated than configuration. When a company decides it needs advanced functionality, they can have a developer write custom code to achieve it. New features, functionality, and user interfaces help a business achieve exactly what it wants. And it’s entirely cloud-based, so your developer will only have to write it once to run it everywhere.
Another way to tailor your Salesforce experience is to connect your back-office applications with APIs. If you’re a developer, you probably already know what an API is. But for those who are new to programming, API stands for Application Programming Interface, and it’s essentially a bridge between two pieces of software, allowing them to connect to each other and exchange information.
Since we made our metadata openly available through APIs, you can connect Salesforce to anything. That includes any of the thousands of our partner apps in the AppExchange. The possibilities are endless.

Friday, July 21, 2017

Salesforce CRM Basics - Salesforce CPQ Basics

CPQ stands for configure, price, and quote. To remember that, think of these questions: What products does the customer want to buy (configure)? How much do those products cost (price)? How can we give the customer details about the sale (quote)?
You ask and answer these questions every day. Salesforce CPQ makes the process much easier for you and your team. And it helps you produce a quality quote that’s complete and accurate and that looks professional.

With Salesforce CPQ, you and your sales team can create quotes quickly, with minimal effort and minimal error. Here’s a little rhyme to introduce you to the wonders of CPQ:
The C is for configure. You pick out what they’ll buy.
The P is for price. We add it up, easy as pie.
The Q is for quote: A nice PDF for you.
And that’s what you get with Salesforce CPQ.
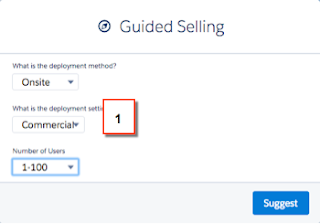
You start by answering a few simple questions about your customer and what they’re looking for. For example, is your customer a commercial, government, or academic institution? Based on your answer to this and other questions specific to your sales process at Infinity Solutions, you see a tailored list of products. Salesforce CPQ uses smart rules to make sure you and your reps sell related products together [1] and to prevent incompatible products from ending up on the same quote.
You have to find the right price for the products you’re selling, and Salesforce CPQ serves as the pricing source of truth. You and your reps can apply discretionary discounts [1] while Salesforce CPQ handles the rest, including the math [2]. Yes, Salesforce CPQ does all the math, automatically. You focus on your customers, not your calculator.
In no time, you’re ready to generate a PDF with all quote details and send it to your customer with just one click. Because you can customize the look of your company’s quotes, they appear professional, and when the whole team uses Salesforce CPQ, every quote looks consistent with the rest. The quote is dynamic too, so if your quote requires special terms, they appear automatically. Add e-signature integration, and you’ll be closing deals faster than ever.
Using Salesforce CPQ, you and your sales team can go from creating a new opportunity to handing the customer a quote in a matter of minutes. A faster, more controlled process means fewer errors, speedier closed deals, more accurate data, and more deals moving through the pipeline.
Salesforce CPQ can help turn your sales team into a lean, mean selling machine.

A Quote is both the document you give the customer and the electronic record of quote data. Your opportunity is where you go to create a new quote. You can create many quotes on that opportunity, but only one can be your primary quote.

However many quotes your opportunity contains, only one can be designated as primary, which means it has a special relationship with the opportunity. For example, the primary quote pushes the total quote amount into the Amount field on your opportunity. The Products related list also updates with the products from your quote. If you later make a different quote primary, your opportunity automatically updates to reflect the new details.

After you create a quote, you add products. Salesforce CPQ makes it easy. You click Add Products to display a list of active products, and you simply check which products you want to include on the quote [1].
This list of products updates whenever new products are created or old products are retired. Customizable filters help you find the products you’re looking for. Your Salesforce admin can group products into categories, such as Product Family, for even easier product selection.

Sometimes your customers don’t know which products they want to buy. They know their business requirements, but not the specific products that meet those needs. Sometimes you don’t know what products are best either. Salesforce CPQ can help by leading you through a guided selling process. When you answer a series of questions [1], you get a list of suggested products that fit the bill.

The guided selling process begins when you start adding products to a quote. Your answers to the guide questions determine which products Salesforce CPQ suggests. Sometimes your answers prompt Salesforce CPQ to ask you follow-up questions. You get a dynamic, responsive experience with each quote you create, and you easily find the products that best meet your customers’ needs.
Sometimes you have to sell products as a package because the component products depend on each other. With Salesforce CPQ, your Salesforce admin can group products in a set and enforce rules to ensure the set is complete and accurate. These sets are called bundles.

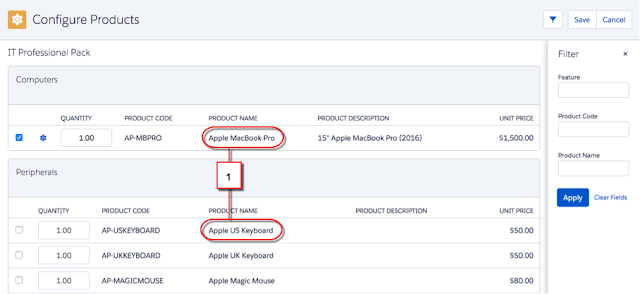
You configure a bundle by choosing a product that’s associated with other products. You see an easy-to-use interface that presents related products that are part of the bundle [1]. Not only does this simplify your product selection, it reminds you and your sales team to discuss potential up-sells or future optional purchases.
You can’t select invalid combinations of products when you configure a bundle. Salesforce CPQ enforces your business logic so that you only present the customer with a technically viable quote. This means fewer errors and less work for you.

When you add products to a quote, your quote automatically calculates the product prices. After that, any updates to your quote, such as changes in the quantity of the products, are reflected in the quote pricing. Subscription products and prices are automatically calculated as well, based on the subscription term you defined when you created the quote.
The starting point for most of your products is the standard Salesforce price book. A price book gives you a list price, or standard price, for all Infinity Solutions products. And of course, if you use multiple price books and multi-currency you can expand upon that basic starting point. And if Seamus in Sales Operations wants to define a special product price for one of your accounts, MondoCorp, he can create a Contracted Pricing just for them.
Beyond that starting point, Salesforce CPQ lets you use different pricing methods on a product-by-product basis. This means Infinity Solutions can account for the various ways you need to price your products. For example, Seamus can set a unit cost for a product, and then you and your sales team can apply a markup for a Cost Plus Markup pricing method. If Infinity Solutions has a product that should have a specific price if the quantity falls in a certain range, Seamus chooses the Block Price method. There Seamus defines the various quantity blocks and the price associated with each block.
Salesforce CPQ offers more functionality beyond getting an initial product price. Seamus can apply Discount Schedules to handle tiered discounts for volume-based prices. He can also apply Discount Schedules to subscription products and automatically discount them based on the overall subscription terms you set for a quote.
When you need even more flexibility, you and your sales team can manually enter discounts line by line [1]. And Seamus can handle even more complex pricing scenarios with Salesforce CPQ, like capturing condition-based pricing and calculations with price rules.
A typical PDF quote contains a list of products and services you’re quoting [1] and the prices and discounts on those items [2]. If prices and discounts also have totals and subtotals [3], they display in summary below the list of products and services.
Any important terms and conditions are also in the PDF document [4]. Depending on the products and services being quoted, you sometimes provide additional specification documents for review.
Since this is the final document for your customer to sign, the PDF includes appropriate signature blocks [5].
 As you can see, there’s a lot of information to display in this PDF document. What information to include, and when or how to present it, can differ from customer to customer. In Salesforce CPQ, the PDF document is dynamic.
For example, you can hide specific columns in the line items table under certain conditions. Specific pages, sections, and even individual quote terms can appear dynamically as well. You can add to the output by attaching supplemental materials, such as product specification sheets, to get a single, concatenated PDF.
After you finalize the information to display on the quote, you generate the PDF document itself. The document is stored on both your quote and your opportunity, so others at Infinity Solutions who have internal access can open and view the quote when they need to.
Then you choose one of several ways to share the quote with your customer. Here’s a simple method: With the click of a button, send the quote as an email attachment using a standard Salesforce email template.
Just remember: Salesforce CPQ can dynamically display several different pieces of information about your quote, quickly and easily, in a PDF document. And you can email that PDF to your customer like you would any other email attachment.
For some customers, you choose subscription-based products or services that have a defined start and end date. In those cases, your Closed/Won quote and opportunity result in a contract for the duration of those subscription products. Eventually the contract will end, and you’ll have an opportunity to create a quote for a renewal sale. Salesforce CPQ automates this entire process so creating contracts and quoting renewals is seamless for you and your sales team.
Salesforce CPQ uses the standard Salesforce Contract object, which is associated with your customer’s account. On your opportunity, there is a Salesforce CPQ field, “Contracted” [1], that triggers the contract and renewal cycle.
At the end of a successful sale, you mark the Opportunity as Closed/Won. Your Salesforce admin can create a workflow rule to kick off an automated process that marks the Opportunity as Contracted and creates a Contract on your customer’s Account. The contract includes subscription records for any subscription-based products and keeps track of what products need to be renewed later on.
Once you have a contract with your customer, Salesforce CPQ can easily handle updates to products included on that contract with an amendment. All the business logic you used during the original product selection also applies when you add or remove products from the contract. When you amend your customer’s contract, Salesforce CPQ creates a new quote and opportunity. On your new quote, the subscription products are priced according to how much time is left on the contract.
Salesforce CPQ can automatically create renewal opportunities and quotes for subscription products before your customer’s contract ends. Your renewal opportunity contains all subscription items with quantities from the existing contract, and is automatically updated with additional subscription products if an amendment opportunity is marked as contracted.
When your renewal opportunity is ready for a final quote, Salesforce CPQ can automate that too. The new quote pulls in all added subscription products and any updated pricing. After Salesforce CPQ creates the new quote, you can edit it and add more products or services if you want. Or, you can simply send the renewal quote out for your customer’s signature. Throughout this process, your renewal opportunity and quote populate any pipeline reports or forecasts maintained by Seamus on the sales operations side. He always has the most complete and up-to-date information.
Find the right products, get the right prices, and put together a quote in minutes. Salesforce CPQ makes every step easier, so you and your sales team close deals faster. You can quote us on that.

Wednesday, July 19, 2017

Salesforce CRM Basics - Chatter Basics

Chatter is a Salesforce collaboration application that lets your users work together, talk to each other, and share information, all in real time. Chatter connects, engages, and motivates users to work efficiently across the organization, regardless of role or location. Chatter lets users collaborate on sales opportunities, service cases, campaigns, and projects with embedded apps and custom actions.
Use Chatter in your favorite browser or on your phone or other mobile device. The Salesforce1 mobile app offers a rich and powerful mobile interface for collaboration on the go.
Chatter helps you learn more about your coworkers and gives you an easy way to get in touch with them. In Chatter, everyone has a profile page with a photo and work-related information. Easily discover which teams they’re on, who their managers are, where they’re located, and how to contact them.
One of the most useful communication tools in Chatter is following. You can follow people, groups, topics, files, and records, like opportunities and accounts. When you follow people, you see their posts, comments, and likes in your feed. People can follow each other independent of their teams, which helps collaboration across functional borders. When you follow files, topics, and records, you are notified when they change. You can follow a maximum combined total of 500 people, topics, and records. All Chatter users can configure their own email notification settings and control the number of notifications they receive.
At Salesforce, departments and functional teams have Chatter groups. Typically, groups are organized around a common goal or interest—anything from product-related groups in sales and marketing, to internal training, human resources, and facilities. The group feed provides a central point of communication for all group members. In the feed, group members can talk to each other, raising the visibility of information and creating a record that members can visit again and again.
Chatter’s advanced search engine lets people find files, people, groups, teams, work records, and other information. Over time, Chatter becomes your company's corporate memory. It’s searchable and accessible anywhere, anytime. It connects people across departments and geographies.
Click someone’s name anywhere in the application to see their profile page. The Feed tab shows the user’s personal feed. The user goes here to see posts from the people, topics, files, and records they have followed. The Overview tab shows information about that user (Skills and About Me), files the user owns, groups the user belongs to, who the user is following, and who’s following the user.
The Contact section is where users go to update their profile picture, contact information, and About Me content. Users can also update About Me on the Overview tab. 
Chatter publisher is the piece of the Chatter UI that you use to post content to a feed. The Chatter publisher appears not only on your profile page, but also on the Home tab, Chatter tab, and group and record detail pages. Users can post updates, attach a file or a link, publish a poll, or ask a question. The More menu can provide even more options, like posting a special thank you icon to thank a coworker for an assist.
Groups are the main collaboration space in Chatter where people organize around a shared interest, purpose, or goal. People use their groups to share information, post updates, and ask questions.
Salesforce provides various group types for different purposes and audiences.
  • Public groups are visible and open to all employees. Anyone in the company can join a public group, and post, comment, and add files to it.
  • Private groups are open only to group members. People must request to join a private group. Only group members can post, comment, and add files. Nonmembers can see the group’s picture and description, but they can’t see the group feed or files.
  • Unlisted groups are invitation-only and don’t appear in list views and search results. An unlisted group is hidden from everyone except group members. Only the group’s owner or manager can invite people to join an unlisted group.
  • Groups with customers are private or unlisted groups that allow external users, like customers, to be members. The group owner or manager must invite external users to join. You can apply the Allow Customers option to private and unlisted groups.
  • Broadcast only groups allow only owners and managers to create posts. Group members can comment on them. You can apply the Broadcast Only option to private, unlisted, and public groups.
When you set up Chatter for your company, seed it with groups around common interests and functional teams. Examples of functional teams include product-related groups in research and development or sales and marketing, an internal training team, human resources, and facilities. Chatter groups make collaboration easier, take project management to another level, and provide a great way for teams to keep up. Here are some groups that have been successful at other companies. Remember, groups can be either public for every employee or private for select people.
All Company (public)
Add all employees to this group to discuss company-wide topics and make announcements.
My Team (private)
Add team members to this group to discuss projects you’re working on, give feedback, and share presentations, spreadsheets, and documents.
Competitive (public)
Connect customer-facing employees with competitive and product experts in your company to crowdsource answers and beat the competition.
Product Feedback (public)
Provide client feedback from your sales and customer service teams directly to R&D and engineering.
Marketing (private)
Share concepts for creative campaigns, provide event details, and brainstorm marketing ideas with the whole team.
Sales (public)
Create a place for sales employees to share stories, best practices, and tips for winning, and get feedback on deals.
Customer Meetings
Create groups where all the key players on a deal can collaborate more easily on presentations, agendas, and products. For example, start a group for a customer visit called “Acme July Meeting” and invite sales, technical specialists, marketing, support, and engineering to align everyone.
Evangelize Policy (broadcast)
Provide a forum for broadcasting division, department, or team policies and inviting feedback from members.
Unlisted groups and group records are disabled by default. We enable them on the Chatter Settings page before we create our groups.

Unlisted groups and group records are disabled by default. We enable them on the Chatter Settings page before we create our groups.
  1. From Setup, enter Chatter Settings in the Quick Find box.
  2. Click Chatter Settings then Edit.
  3. Select Allow Records in Groups (1) and Enable Unlisted Groups (2), then click Save.
Private Chatter groups are a great way for product teams to collaborate and share confidential information. Private groups can also have external members. For example, create a private group to collaborate with customers or subject matter experts outside the company.
Private groups that allow customer members have a visual reminder—an orange Private With Customers banner on the group picture. People outside the company who join the group are listed in the Members section under CUSTOMERS (1).
Following is a way to identify the people and records you want to keep track of. When users follow people and records, they see updates from those people and records in their feed. For example, when users join a group, they see updates that are posted to the group in their feed.
When you turn on Chatter for your company, it sets up some “following” relationships automatically. For example, if your company has less than 16 Chatter users, all users automatically follow each other and up to 25 most recently used records. If your company has 16 users or more, they automatically follow up to 25 of their most recently used records and up to 25 users in the company, including:
  • Their manager
  • Users who report to their manager
  • Their subordinates
  • Teammates on their account teams
  • Teammates on their opportunity teams
Of course, people can change which records and people they follow.
For example, to follow or unfollow a person, hover over their name anywhere in the application and click Chatter follow icon to follow or Chatter unfollow iconto stop following.
Everything comes together on the Chatter tab, where different views and filters let your users choose the updates they see in their feeds.
The feed views (1) show updates from people, groups, and records your users follow, updates that address or mention your users, updates your users bookmarked, feed items your users muted, or all updates in your company. The feed filters (2) give users a way to narrow down the updates and sort them by post date or most recent activity (3).
In your Chatter organization, context is key. Encourage your users to always consider the context of a post.
  • Who is the audience? The target audience determines where to post an item.
  • What is the relevance for followers?
  • How can users engage people who may not otherwise see the post? For example, users can add topics via #hashtags, or @mention someone in a comment.
This table explains where a post appears and who can see it.
When you turn on email notifications for Chatter, users automatically receive emails about new posts, comments, and other changes.
Users can keep the default notifications you set up, or they can configure their own email settings. Users control whether they want to receive emails, for which changes, and how often. It’s important to teach your users how they can control the amount of email they receive. Too many email notifications are a pain point for many Chatter users and a common barrier to adoption.
You enable email notifications for all users in Setup, on the Chatter Email Settings page.
  1. In the Setup Quick Find box, enter Email Settings, then click Email Settings.
  2. Select
    • Allow Emails to turn on Chatter email notifications for all users.
    • Allow Email Replies to allow users to reply to email notifications about messages and comments via email instead of navigating to the comment or message in Chatter.
    • Allow Posts via Email to allow users to post to groups using email.
    • Allow Attachments via Email to allow users to include attachments in posts to groups using email.
    • Show Salesforce1 mobile app download badges to add App Store and Google Play badges for the Salesforce1 downloadable apps to all Chatter email notifications from your internal org. Use badges to help increase user adoption of the Salesforce1 mobile app.
  3. Click Save.
Your users can control whether they receive Chatter notification emails and how many they receive. Users set up Chatter notifications on their Email Notifications page.
To navigate to the Email Notifications page, users click the down arrow next to their name at the top of any Salesforce page and select My Settings. Under My Settings, they expand the Chatter node and click Email Notifications.
To receive Chatter mail, Receive emails must be selected.
Email digests conveniently summarize recent activity in Chatter so your users don’t miss important discussions. They can choose to receive personal or group digests on a daily or weekly basis, and some digest settings are customizable. Personal digests include the updates users see in their own Chatter feed, like updates about the people, records, and files they follow and the groups they belong to. Group digests include the updates they see in a particular group’s Chatter feed.
When your users change the default frequency of notifications for groups they join, it doesn’t affect the groups they already belong to.

When your users follow people and records, they see posts, comments, and updates to them in their Chatter feeds. Chatter feeds appear on profile and group pages, the Home tab, topic detail pages, and on record detail pages. Typically, people see feed updates for:
  • Posts, comments, and files on Chatter groups they're a member of
  • Shared files and links
  • Tasks and events
  • Record field changes
Topics give users a way to add searchable terms to their feed posts. Topics are great for adding to an ongoing discussion that is independent of a particular group. For example, your users can add the topic #newtech to many different posts in many different feeds. When any user searches for #newtech, their search results include all posts marked with that topic from all feeds the user has access to.
There are several ways for users to add topics. The fastest way is to use a hashtag (#). For example, when a user posts “I’m going to attend #Dreamforce this year,” “Dreamforce” is automatically added as a topic. Users can click a topic to see all other content that was tagged with that topic. They can also search for a topic and find all posts they can access that include that topic. Your users can also add topics to their own and other’s posts at any time directly in the feed (1, 2).
Besides clicking a topic or searching for one, users can click Topics (3) to navigate to the topics list. The topics list shows the topics people are talking about in your organization. All topic names appear in this list, including topics used solely in private groups or on records.
Apart from adding topics to posts, users can also add topics to any objects you allow. Adding topics to objects is one of the most powerful ways to crowdsource your company's key themes and issues. Once you set it up, your employees can add topics to object records based on what they're seeing in the field when they work with customers. Doing so can give your business insight into the voice of your customer. And because topics can cross objects, they can provide connections across people, conversations, and records.
You can enable topics for objects like accounts, assets, campaigns, cases, contacts, contracts, files, leads, opportunities, orders, solutions, custom objects, and English articles. For each object type, you specify which fields to use for topic suggestions.
Let’s enable topics for contacts.
  1. From Setup, enter Topics for Objects in the Quick Find box, then select Topics for Objects.
  2. Select Contact.
  3. Select Enable Topics, then select the fields you want to use for topic suggestions. For example, select Name and Account Name. From a combination of the selected fields, up to three suggestions are made from the first 2,000 characters.
  4. Click Save.
  5. Now, users with access to contacts and appropriate topics permissions can:
    • See topic assignments and suggestions on records of that object type
    • Add and remove topics from records of that object type
    • Use topics on records of that object type to filter their list views
    • Click any topic assigned to a record to go directly to the Topic page in Chatter. On the Topic page, you can find other records on the topic, people who are knowledgeable about the topic, and other related information.
Feed tracking has many uses, but one of the most powerful is the visibility provided when you're on the go and using the Salesforce1 mobile app. Feed tracking makes it easy to see what's changing anytime, anywhere.
You can track fields on the user, group, and topics objects, custom and external objects, and the following standard objects: account, article type, asset, campaign, case, contact, contract, dashboard, event, lead, opportunity, product, report, solution, task, and work order.
If you enable feed tracking for certain objects, some fields are automatically tracked by default. You can still change which fields you want to track. Here are fields that are tracked by default when you enable feed tracking for:
  • Account: Account NameAccount Owner
  • Case: Case OwnerPriorityStatus
  • Chatter Group: Allow CustomersDescriptionGroup AccessInformation BodyInformation TitleNameOwner Name
  • Contact: Account NameContact OwnerName
  • Lead: Lead OwnerLead StatusName
  • Opportunity: AmountClose DateOpportunity NameOpportunity OwnerStage
  • Topic: Description
  • User: About MeAddressEmailManagerPhoneTitle
Sharing rules and field-level security determine visibility of record changes in Chatter feeds. Users must have access permission to a record to see changes to that record in their feed.
Even though you can track up to 20 fields per object, be selective and track only the fields that are important to your users. They get a post in their feed whenever someone changes a tracked field on a record. Work with your teams to find out which record changes really matter to them and enable feed tracking for only those fields.
Actions add functionality, like post, poll, and question, to the Chatter publisher. Actions let your users do more in Salesforce and Salesforce1.


Actions are all about productivity. Actions let users accomplish things with fewer clicks, fewer fields, and faster results. Actions are especially useful in Salesforce1 because they make it easy to create and edit records with a simple, mobile-optimized interface. By default, the Chatter publisher includes the standard actions Post, File, Link, Poll, and Question.
In Salesforce1, actions appear in the action bar, its associated action menu, and as list-item actions.

There are several categories of actions, such as standard Chatter actions, default actions, mobile smart actions, custom actions, and productivity actions.
  • Standard actions are actions that are automatically included when Chatter is enabled—such as Post, File, Link, and Poll. You can customize the order in which these actions appear, but you can’t edit their properties.
  • Nonstandard actions are actions that you create and customize yourself.
  • Default actions are Salesforce predefined actions for getting you and your users started using actions in your organization. Make default actions available to your users by adding them to publisher layouts.
  • Mobile smart actions are a set of preconfigured actions, just like default actions, and are supported on the same list of objects.
  • Custom actions invoke Lightning components, Visualforce pages, or canvas apps with functionality that you define. For example, you can create a custom action to enable users to write comments that are longer than 5,000 characters. You can create an action that integrates a video-conferencing application for face-to-face meetings between support agents and customers.
  • Productivity actions are predefined by Salesforce and are attached to a limited set of objects. Productivity actions aren’t editable, nor can they be deleted.
You can add actions to publisher layouts that appear on global pages, like the Home tab and the Chatter tab. You can also add actions to object-specific pages that have a feed, like the account page.
Use global actions to customize publisher layouts that appear on global pages, like the Home page and the Chatter page. Publisher layouts also drive the actions that users see in the action bar and action menu on the Feed and People pages in Salesforce1.
To add global actions to the publisher, enable the Actions in the Publisher feature in Chatter Settings.
  1. From Setup, enter Chatter Settings in the Quick Find box, then select Chatter Settings.
  2. Click Edit.
  3. In the Actions in the Publisher section, select Enable actions in the publisher.
  4. Click Save.


Now that you created the action, add the action to the publisher to make it available to users.
  1. From Setup, enter Publisher Layouts in the Quick Find box, under Global Actions, select Publisher Layouts, then, next to Global Layout, click Edit.
  2. Select Quick Actions (1), then click New Contract (2), and drag it to the Quick Actions in the Salesforce Classic Publisher section (3).
  3. The position of the action determines where it shows up in the publisher on the Home or Chatter tab. By default, the first three actions appear on the publisher, any additional actions appear in the More drop-down list. To change an action’s position, drag it to the desired position. For example, drag the New Contract action to the third place in line.
  4. Click Save.

The New Contract action now appears in the publisher on the Home and Chatter tabs.
By default, the groups publisher inherits the global publisher layout, which doesn’t include group-specific actions like Announcement or Add Record. Group announcements let group owners and group managers highlight important messages on the group page. To show the Announcement action in the group publisher, you must first override the global publisher layout.
  1. From Setup, enter Group Layouts in the Quick Find box, then select Group Layouts.
  2. On the Group Page Layout next to Group Layout, click Edit.
  3. To open the group layout to changes, click Quick Actions (1) in the Group Layout palette.
  4. Scroll to the Quick Actions in the Salesforce Classic Publisher section, and click override the global publisher layout (2).
    Now you see the actions that are available in the group publisher, including the Announcement action.
  5. In the Quick Actions in the Salesforce Classic Publisher section, drag Announcement to the third position.
    In the Chatter UI, the first three actions appear above the group publisher, the other actions appear on the More drop-down list. To change the order of the actions, drag them to the desired position.
  6. Click Save.
When you add an announcement to a group feed, it appears in a yellow highlighted area below the group photo (1). It also appears as a post in the group feed (2). Group announcements are shown until 11:59 p.m. on the selected expiration date, unless they’re replaced by a new group announcement. Users can discuss, like, and post comments on announcements in the group feed. Depending on how they’ve set up their notifications, group members receive an email notification when an announcement is posted.


Here’s an example of a group Announcement (1), announcement post (2), and the Announcement action (3) on the publisher. We moved the announcement action next to the File action, so it appears above the publisher rather than on the More menu.
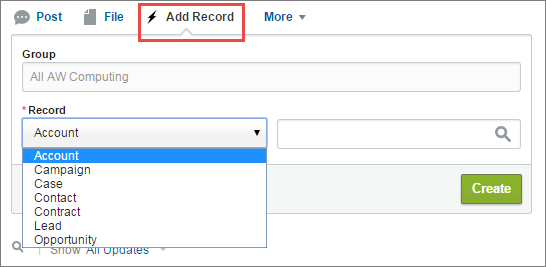
Now let’s add another useful action to the group publisher: Add Record. This action allows users to add an existing record to a group directly from the group publisher.
  1. In the Group Layout palette, click Quick Actions.
  2. Click Add Record and drag it to the Quick Actions in the Salesforce Classic Publisher section.
  3. Click Save.
Now the Add Record action is available on the group publisher in all groups.

When users add a record, like an account, the record appears in the related lists section under Group Records on a group’s page. In Salesforce1, users can access the record under Records on the group’s Related page.
You can add various other handy actions to the group publisher, like New Account, New Task, Log a Call, or Add Member. To add more actions, drag them from the palette to the Quick Actions in the Salesforce Classic Publisher section.
Seed groups with relevant records, and show your users how to do it. Here are some ideas about using Chatter groups as a collaboration space for records.
  • A sales team working together on an account can track the related opportunities, contacts, and leads in one group. Team members with permissions can access records directly from the group. New team members can use the group as a one-stop reference to familiarize themselves with historical discussions about the account and its child records.
  • Customer service teams can use groups to track the cases they handle. The group can become the team’s forum to monitor cases, discuss solutions, and analyze trends in common problem areas.
  • Marketing teams can use groups to track their campaigns, plan events, and discuss the potential leads and contacts to invite to the event. Groups also make for a great space to collaborate on marketing content or campaign artifacts.

Approvals in Chatter

An approval process is an automated process your organization can use to approve records in Salesforce. It specifies the steps necessary for a record to be approved and who must provide approval at each step. The approval process can send out an approval request as a Chatter post.
Because Approvals in Chatter rely on both Chatter and Approvals, getting set up for Approvals in Chatter involves more than just turning the feature on. To be sure that everything works correctly and your users see their approval requests as Chatter posts, we recommend that you follow these steps.
  1. Enable Approvals in Chatter.
  2. Create an approval post template.
  3. Create an approval process.
  4. Ensure that Chatter feed tracking is enabled for the object on which your approval process is based.
  5. Repeat steps 1–3 for all approval processes in your organization, as needed.
After you enable Approvals in Chatter, users can update their own Chatter settings to opt out of receiving approval requests as posts in their Chatter feeds. Users who elect to receive approval requests via Chatter receive both an email notification and a post in their Chatter feed. Approval request posts appear:
  • In the assigned approver's Chatter feed
  • On the submitter's profile, but not in their Chatter feed unless they're following the approval record
  • In the Chatter feed of the approval record
  • In the Chatter feed of anyone following the approval record
  • In the object-specific filter on the Chatter tab of anyone following the approval record
  • In the Company filter of every user with access to the approval record
To enable Approval requests in Chatter:
  1. From Setup, enter Chatter Settings in the Quick Find box, then select Chatter Settings.
  2. Click Edit.
  3. In the Approval Posts section, select Allow Approvals.
  4. Click Save.
If users opt out of receiving approval request posts, they don't see them in their own feed but can see posts in the record's feed. Anyone with access to the approval record can see approval posts in the record feed.
Next, you set up your approval post template.
Creating a Chatter post template requires the “Customize Application” permission.
  1. From Setup, enter Post Templates in the Quick Find box, then select Post Templates.
  2. Click New Template.
  3. These approvals are for accounts, so select Account and click Next.
  4. Enter the name Account Approval Post Template, and describe it as A template for account approval request posts.
  5. Make this template the default for all account approval request posts by selecting Default.
  6. For Post Template Fields, move Account NameAccount NumberAccount Owner, and Description to the right column.
  7. Click Save.
With our post template in place, let’s create a simple approval process for accounts.
Let’s say you want the VP of Sales, Allison Wheeler, to approve new accounts and changes to existing accounts she doesn’t own. Here’s a simple approval process for this scenario.
  1. From Setup, enter Approval Processes in the Quick Find box, then select Approval Processes.
  2. Choose Account for the object for the new approval process.
  3. Click Create New Approval Process and choose Use Jump Start Wizard from the drop-down button.
  4. In the Approval Process Information section (1)
    1. Enter a name for the new approval process.
    2. Enter a unique name to refer to this component in the API.
    3. Leave the Approval Assignment Email Template field blank to use the default email template.
    4. For Approval Post Template, click the search icon and select the template you created for standardizing the approval request post.
    5. Select Add the Submit for Approval button and Approval History Related List... to add the button and to allow users to submit and track approval requests.
  5. In the Specify Entry Criteria section (2), set up the criteria the record must meet to enter this approval process. In our example, we want Allison Wheeler to approve all accounts she doesn’t own.
  6. In the Select Approver section (3), assign all approval requests to Allison Wheeler.
  7. Since we’ve named only Allison Wheeler, for When multiple approvers are selected, select Approve or reject based on the FIRST response.
  8. Click Save. For our simple example, we’re not going to add more actions.
  9. Click View Approval Process Detail Page.
  10. On the Account: New Account Approval page, click Activate to activate the approval process you just created.
Our simple approval process is now set up. When someone other than Allison Wheeler creates an account or changes the owner on an account and submits the account for approval, Allison Wheeler gets an approval request notification via email and an approval request post in her feed.
Once your chatter is live, you can track your results. You can download Chatter Usage dashboards from AppExchange. You can also download the Chatter Challenge dashboards to monitor group and following activity on Chatter.

Your Community Manager can use both of these dashboards to monitor the overall health of your Chatter adoption. Your Community Manager can also conduct surveys, either using Chatter polls or through focus groups, to gauge the response to Chatter and prioritize future work.
We recommend that you roll out Chatter to everyone at the same time. However, if your company is large or you want to restrict access to Chatter, consider a profile-based rollout. A Chatter profile-based rollout is more useful for larger companies because it allows for a controlled, department-by-department rollout. It’s also useful for companies or government agencies with regulatory constraints to give full or no access to Chatter based on employee roles and profiles. With a profile-based rollout, only the users with the required user profile or permission sets will have access to Chatter.
If there’s no need for a profile-based rollout of Chatter, you’re all set.
From a high-level perspective, a profile-based rollout of Chatter consists of these steps:
  • You contact Salesforce, and ask us to enable a profile-based rollout of Chatter for your organization.
  • You determine which users should and shouldn’t have access to Chatter.
  • You review and modify existing custom user profiles and permissions sets. For example, verify that the Enable Chatter permission in a custom user profile or permission set has the desired setting.
  • You turn on Chatter for your organization.
For more information about profile-based rollout of Chatter, read Control Chatter Access through User Profiles and Control Chatter Access through Permission Sets.

Lightning Inter-Component Communication Patterns

Lightning Inter-Component Communication Patterns If you’re comfortable with how a Lightning Component works and want to build producti...